Policy-Based Authorization in ASP.NET Core
Authorization is the process of determining whether a user is allowed to access a resource. Policy-based authorization helps to verify one or more requirements to authorize the user. The policy-based authorization helps to separate the application logic and authorization logic
We will see step by step how to implement policy-based authorization on ASP.NET Core MVC. In this example, the policy-based authorization is going to authorize whether the user is from the state of Florida or not. This will allow the user to access the page only when the user state is Florida
Step 1:
In the first step, I created a class to get user information. For demo purposes, I have added two data. But in a real application, you need to get information from the database.
public class Users
{
    public string Username { get; set; }
    public string Password { get; set; }
    public string State { get; set; }

    public IEnumerable<Users> GetUsers()
    {
        return new List<Users>() { new Users { Username = "peter", Password = "123", State = "Florida" },
                                   new Users { Username = "parker", Password = "456", State = "Iowa" }};
    }
}
Step 2:
At this step, I have implemented simple cookie authentication. This controller has a login and logout process. To authorize the state, I have added the user state in a claim with claim type StateOrProvince.
public class AccountController : Controller
{
    [HttpGet]
    public ActionResult Login()
    {
        Users user = new Users();
        return View(user);
    }

    [HttpPost]
    public async Task<ActionResult> Login(Users user)
    {
        var usrs = new Users();
        var result = usrs.GetUsers().FirstOrDefault(u => u.Username == user.Username && u.Password == user.Password);
        if (result != null) // Check DB value
        {
            var userClaims = new List<Claim>()
                        {
                        new Claim(ClaimTypes.Name, result.Username),
                        new Claim(ClaimTypes.StateOrProvince, result.State),
                        };

            var identity = new ClaimsIdentity(userClaims, CookieAuthenticationDefaults.AuthenticationScheme);

            var userPrincipal = new ClaimsPrincipal(new[] { identity });

            await HttpContext.SignInAsync(userPrincipal);

            return RedirectToAction("Index", "Home");
        }

        return View(user);
    }

    public ActionResult AccessDenied()
    {
        return View();
    }

    public async Task<ActionResult> Logout()
    {
        await HttpContext.SignOutAsync(CookieAuthenticationDefaults.AuthenticationScheme);
        return RedirectToAction("Login", new Users());
    }
}
Step 3:
At this step, I have created a class and inherit the empty IAuthorizationRequirementinterface. There is no method for IAuthorizationRequirement. This helps to monitor whether the authorization is successful or not. State value is obtained at this point.
public class StateRequirement : IAuthorizationRequirement
{
    public string State { get; }
    public StateRequirement(string state)
    {
        State = state;
    }
}
Step 4:
This step is a handler step. Here the class StateRequirementHandler inherits the base class AuthorizationHandler and overrides the HandleRequirementAsync() method. And this code checks whether the state is Florida or not. If it is Florida state then it will set the requirement being successfully evaluated. Finally, it returns the CompletedTask
public class StateRequirementHandler : AuthorizationHandler<StateRequirement>
{
    protected override Task HandleRequirementAsync(AuthorizationHandlerContext context, StateRequirement requirement)
    {
        string userState = context.User.FindFirst(c => c.Type == ClaimTypes.StateOrProvince).Value;
        if (string.Compare(userState, requirement.State, true) ==0)
        {
            context.Succeed(requirement);
        }

        return Task.CompletedTask;
    }
}
Step 5:
This is a Startup class configuration.
Here the AddAuthorization method adds the authorization service to the IServiceCollection.
AddPolicy creates the policy with the given name.
In the following code, the policy name is FloridiansOnly.
The first policy RequireAuthenticatedUser() checks whether the user is an authorized user or not. Next, the customized requirement is included. The StateRequirementHandler is registered using AddSignleton it creates it creates single in instance for the first time of the request. The same instance is used whenever requested.
public void ConfigureServices(IServiceCollection services)
{
    services.AddAuthentication(CookieAuthenticationDefaults.AuthenticationScheme)
            .AddCookie(options =>
            {
                options.Cookie.Name = "SampleCookieAuth";
                options.LoginPath = "/Account/Login";
            });

    services.AddAuthorization(options =>
    {
        options.AddPolicy("FloridiansOnly", policy =>
        {
            policy.RequireAuthenticatedUser();
            policy.Requirements.Add(new StateRequirement("Florida"));
        });
    });

    services.AddSingleton<IAuthorizationHandler, StateRequirementHandler>();

    services.AddControllersWithViews();
}
Added UseAuthorization() middleware in the configuration after UseAuthentication()
public void Configure(IApplicationBuilder app, IWebHostEnvironment env)
{
  ...
  ...

    app.UseAuthentication();
    app.UseAuthorization();

  ...
  ...
}
Step 6:
This step is an implementation of policy-based authorization. Here in the code, I have added the [Authorize("FloridiansOnly")] attribute at the top of the StatePage action. So When the user tries to access the page it will validate the requirement.
public class HomeController : Controller
{
    [Authorize("FloridiansOnly")]
    public IActionResult StatePage()
    {
        return View();
    }
}
Step 7:
The final step is a list of views.
This view shows the link to access the state page.
<a asp-controller="Home" asp-action="StatePage">Only Floridians can access the page</a>
This view will be accessible only to the users who have state Florida. Also, this view contains a link to logout the app.
\Views\Home\StatePage.cshtml<h4>Hi Floridian!!!</h4> <a asp-controller="Account" asp-action="Logout">Logout</a>
The final view access denied page. This page will be displayed whenever an unauthorized user accesses the page. From this example, the user level is not Florida, but the user is trying to access the page, this view will show the Access Denied message.
\Views\Account\AccessDenied.cshtml<h4>Access Denied </h4>
Output:
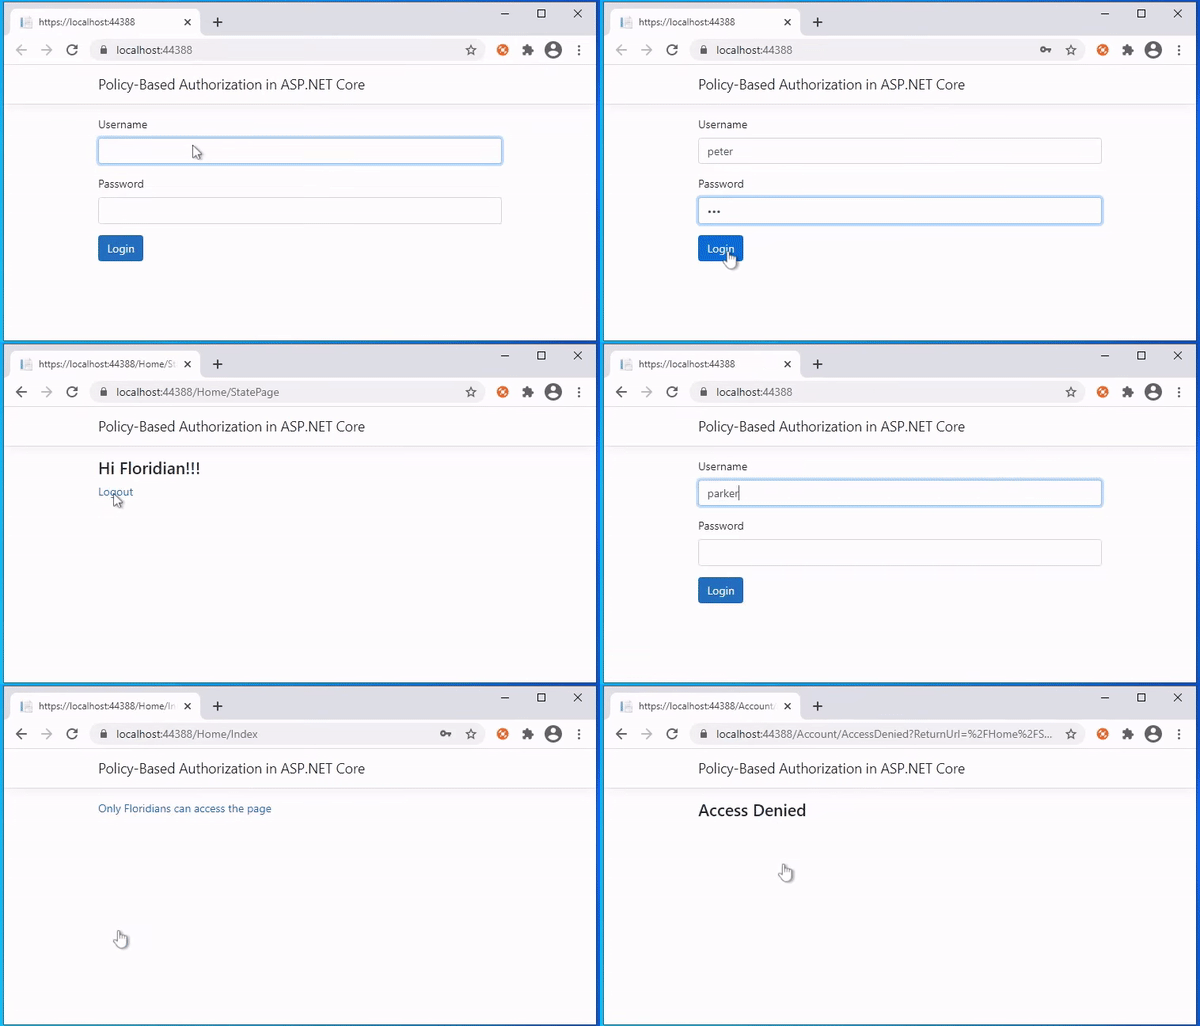
The following is the output of the above code. User Peter's state Florida. So he can access the page. But the user Parker's state is not Florida, so he can not access the page.
I hope this helps you. Keep coding.


Comments
Post a Comment